Callas Rennsport MA1 Camshafts Installation & Timing
Make sure you check TSI for the latest instructions!
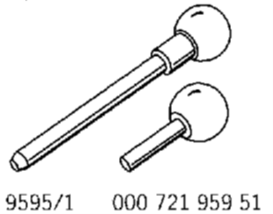
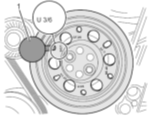
Turn the engine to 60° before TDC (BTDC) and pin the crank pulley at U3/6 with 9595/1.
- Please note: Camshafts are marked in German.
- Please note: The bank #2 Intake camshafts are shorter than bank #1.
- Please note: Do not attempt to clean the vane adjusters in a parts cleaning tank.
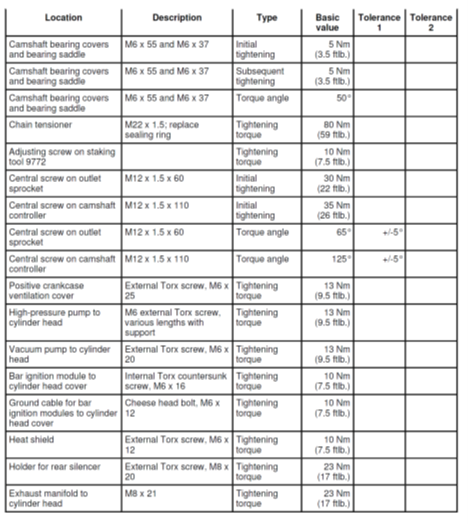
- Access WM 15020 for the workshop information and Torque Specs.
- Always time camshafts while at overlapping position for that bank!
- Always time camshafts while at 60* before TDC power stroke.
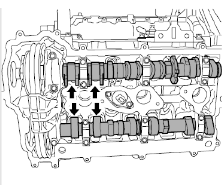
Bank #1 cam lobes facing apart. Bank #2 cam lobes facing each other

Bank #1 (LEFT SIDE) has drive flange for DFI High Pressure Pump
Bank #2 (RIGHT SIDE) has drive flange for vacuum pump
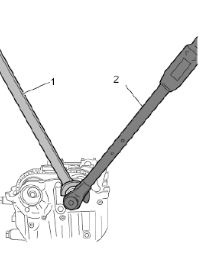
CAMSHAFT TIMING FOR BANK #1:
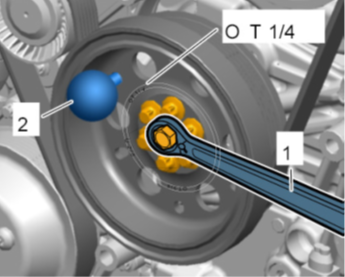
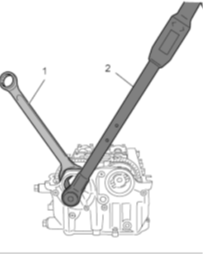
Pin (ITEM #2) 9595/1
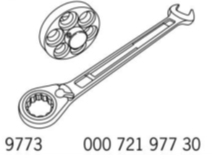
Turning Device (ITEM #1) 9773
Fit the lower (Inner) camshaft bearing saddle:

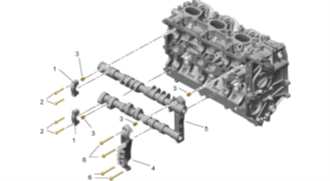
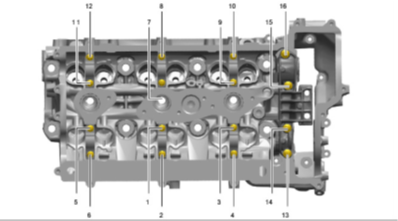
Valve Drive
- Camshaft mounting saddle
- External Torx screw, M6 x 37
- Dowel sleeves for cylinder head – replace if damaged
- Bearing saddle (upper part)
- Bearing saddle (lower part)
- External Torx screw, M6 x 55
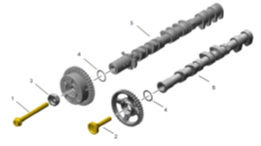
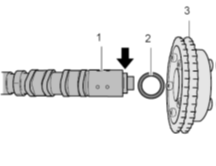
Camshafts
- Central screw for camshaft controller, M12 x 110 (replace screw)
- Central screw for sprocket, M12 x 60 (replace screw)
- Driver for camshaft controller
- Friction plate (replace)
- Intake camshaft
- 6 -Outlet camshaft
Oil the camshaft bearing surfaces. Check to make sure that all the hydraulic lifters are installed properly.
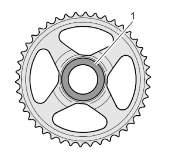
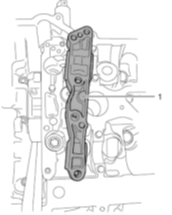
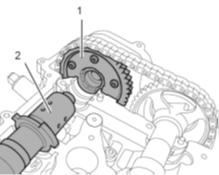
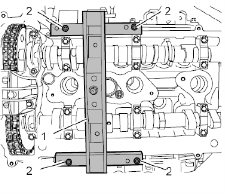
Check to make sure the exhaust sprocket friction plate is installed, ITEM #1:
Install the Exhaust Bank 1 (Cyl 1-3) camshaft with the sprocket already installed. The central bolt should not be torqued, the sprocket should turn loosely:
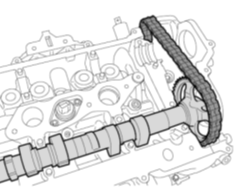
Lift the timing chain to install the exhaust camshaft with the sprocket already installed. The camshaft should lie loosely in its bearings. Install friction plate (#2) onto the Intake camshaft (#1) for bank #1 (Cylinders 1-3).
Lift the timing chain and then install the Vane Adjuster (#1 below) only, then install the intake camshaft for Bank #1 making sure to not drop the friction washer.
Make sure the intake camshaft lies loosely inside the cylinder head.

Install Vane adjuster onto intake camshaft, leave central bolt loosely.
Make sure the camshaft lobes face away from each other.
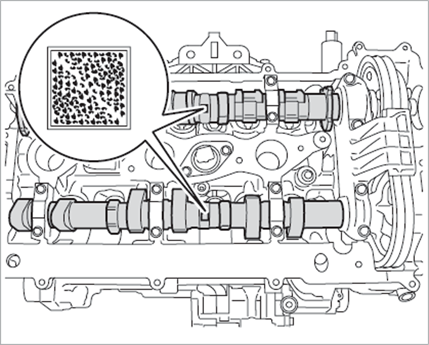
Note Data-Matrix codes for both banks when timing camshafts
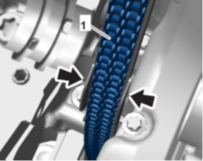
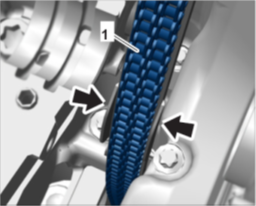
Visually inspect timing chain rails, then installation:
Insure that timing chains are positioned correctly into rails before moving forward
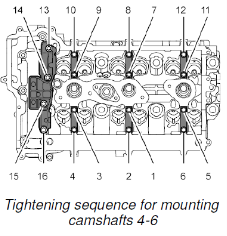
Observe placement markings and fit all camshaft bearing saddles:
Make sure you check TSI for the latest instructions!
Install timing chain tensioner and tighten to 59 ft/lbs.
Set basic timing for bank #1 camshafts, camshaft lobes face apart:
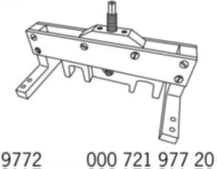
Insert the camshaft adjusting staking tool 9772-1
1= Staking tool
2= Staking guide
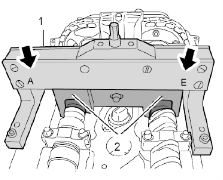
A= Exhaust
E= Intake

Make sure you check TSI for the latest instructions!
Tighten staking tool to 7.5 ft/lbs
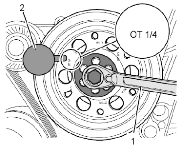
Remove crankshaft pulley locking pin.
Turn engine to TDC 1/4 then re-pin the crankshaft pulley:


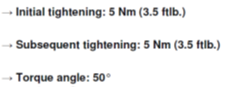
Tighten both camshafts central screws to initial tightening torque, Intake 22 ft/lbs (30Nm) and Exhaust 22 ft/lbs (30Nm).
Remove 9772 Staking tool, remove staking tool, turn engine two revolutions and recheck with staking tool.
When all camshaft timing has been confirmed, tighten as per factory torque specs.
Remove 9772 Staking tool, Tighten camshaft central bolts to final torque of:
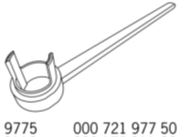
EXHAUST Camshaft Central Bolt Final Torque is 30Nm + 60°, TOOL #9775

INTAKE Camshaft Central Bolt Final Torque is 30Nm + 90° (32mm wrench)
CAMSHAFT TIMING FOR BANK #2:
Turn engine in direction of travel almost one turn clockwise to 60° BTDC, pin crank at U3/6.
Fit the lower (INNER) camshaft bearing saddle:
Oil the camshaft bearing surfaces.
Check to make sure that all the hydraulic lifters are installed properly.
Check to make sure the exhaust sprocket friction plate is installed:

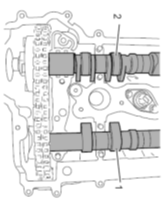
Install the Exhaust Bank 2 (Cyl 4-6) camshaft with the sprocket already installed. The central bolt should not be torqued, the sprocket should turn loosely

ITEM #1: Exhaust Camshaft
ITEM #2: Intake Camshaft
Lift the timing chain to install the exhaust camshaft with the sprocket already installed.
The camshaft should lie loosely in its bearings.
Install friction plate (#2) onto the Intake camshaft (#1) for bank #2 (Cylinders 4-6).

Lift the timing chain and then install the Vane Adjuster (#1 below) only, then install the intake camshaft for Bank #2 making sure to not drop the friction washer. Make sure the intake camshaft lies loosely inside the cylinder head.
Install Vane adjuster onto intake camshaft, leave central bolt loosely.
Make sure the camshaft lobes face each other on bank #2:
- Exhaust Camshaft
- Intake camshaft
Note Data-Matrix codes for both banks when timing camshafts:

Visually inspect timing chain rails, then installation:
Observe placement markings and fit all camshaft bearing saddles:
Make sure you check TSI for the latest instructions!
Install timing chain tensioner and tighten to 59 ft/lbs.
Set basic timing for bank #2 camshafts:
Insert the camshaft adjusting staking tool 9772-1:
A= Exhaust
E= Intake

1= Staking tool
2= Staking guide
Tighten staking tool to 7.5 ft/lbs.
Remove crankshaft pulley locking pin. Turn engine to TDC 1/4 then re-pin the crankshaft pulley:
Tighten both camshafts central screws to initial tightening torque of Intake 22ft/lbs (30Nm) and Exhaust 22ft/lbs (30Nm).
Remove 9772 Staking tool, turn engine two turns and recheck initial cam timing with staking tool.
When all camshaft timing has been confirmed, tighten as per factory torque specs.
Remove 9772 Staking tool, Tighten camshaft central bolts to final torque of:
INTAKE Camshaft Central Bolt Final Torque is 30Nm + 90° (32mm wrench)

EXHAUST Camshaft Central Bolt Final Torque is 30Nm + 60°, TOOL #9775